Solidity in Easy Steps: Building an Escrow Smart Contract (Part 1)
Designing and Developing a Contract from Scratch

Introduction
Learning a new language comes with some challenges which may include: deciding whether the language worth learning in the first place; time allocation; and the hardest of all is persistence in the face of other responsibilities. It's a fact that learning by building a project of interest can be the best motivation to keep the learning going, even when other stuffs need to be attended to.
Hi, this is the first article in a series where we shall be learning Solidity in Easy Steps. We will create a contract for two business partners that doesn't trust each other 🤣🤣. The first doesn't trust the second to deliver his task/goods after payment, while the second doesn't trust the first to pay after fulfilling his part of the deal... 😳😳Sounds familiar. Thus, we suggest an Escrow contract.

Expectations
In this article, we will build an escrow smart contract using Solidity with dummy explanation for each line of code. Readers are advised to manually type in the codes provided. Before we start boiling, lets take a look at what are expected of you so that we can be on the same page.
Assumption: It is assumed that you have a basic understanding of what Solidity is used for and programming in general.
Difficulty: 1/10 (Beginner)
Programming Time: 5min.
By the end of this article, readers should understand:
- How to come-up with a simple class diagram for contracts
- The different types of comments in Solidity programming language
- The basics of Remix IDE
- How to create simple smart contracts
- How to create functions in Solidity
- Solidity
public,payable,viewandthiskeywords - Solidity global
msgvariable
Features to be Implemented
We will have to climb the ladder of features in a stepwise fashion, in this version:
- The funder should be able to fund the contract.
- The funder should specify the sole beneficiary address.
- The beneficiary or anyone should be able to verify that the contract has been funded with the agreed amount
- The beneficiary should be able to see who was designated as the beneficiary.
- The payer should be able to release fund to only the beneficiary
Class Diagram
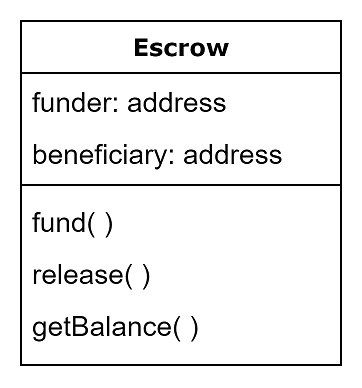
When analyzing or coding an application, professionals start off with a design (such as class diagram). Though not necessary at this stage, but it's good to be accustomed to good practices, hence we are going to come up with a minimalistic class diagram!!, just for conceptualization. What the hell is a class diag!ram??? Simply put, a class diagram is a graphical representation of a system. An up-to-date class diagram allows anyone including your future self to gain insight into the entire contract. Typically, a contract class diagram lists the variables, functions, and events in a contract.
The variables
In this version we will need two variables, which are:
funder : The payer. Everyone should be able to check who deposited the fund. Since blockchain users can be anonymous, how do we then know the funder? Have them create a username? No!!! We can track the wallet address that was used to fund the contract instead.
beneficiary : The proposed recipient. Again everyone should be able to verify this. At least, the beneficiary will be rest assured that the fund has been locked up for him/her.
The Functions
We will need the following functions for this version:
- fund : This function will be called by the funder with the amount to lockup and the proposed beneficiary it's meant for.
- release : This function is to be called by the funder, when ready to release fund to the beneficiary. Note that we don't want a scenario whereby the beneficiary will be able to release funds for themselves.
- getBalance : This function should be accessible to anyone to verify the actual amount that has been locked up in the contract. A function that does nothing other than to get the current value of a variable, like this one, is called a getter function.
Thus, our contract can be depicted as shown below
Development Setup
You don’t need to download anything... What???? That’s strange for a programming session...
In this session, we will be making use of a web-based Solidity development platform called Remix. It can be freely used by accessing its website https://remix.ethereum.org/ . You can learn more about this amazing platform by reading its documentation. Now, to setup our development environment:
Visit Remix Website https://remix.ethereum.org/
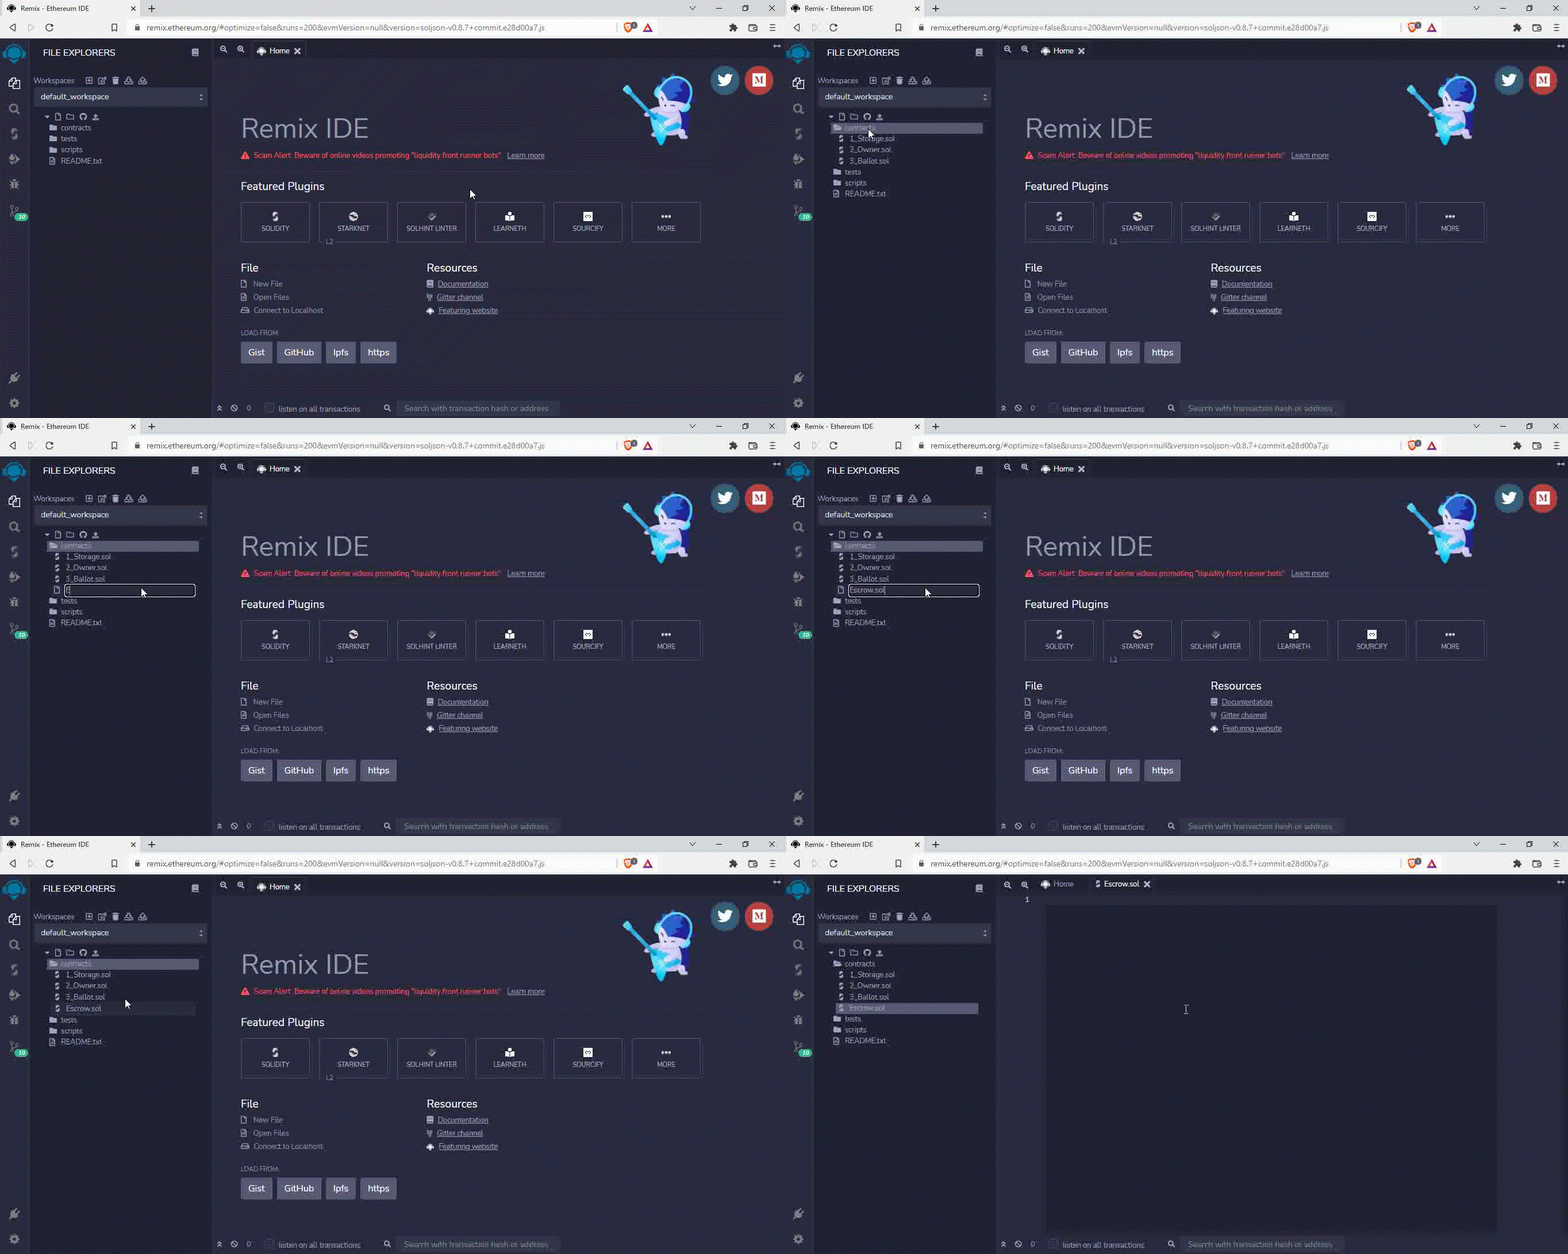
Once Remix has been loaded, create a new file named “Escrow.sol” as shown below.
Coding and Explanation
Next the full code for this version is given followed by a detailed line based explanation. While explaining the code lines we will touch on different aspects of Solidity so read on!!!
Type the lines below into the Escrow.sol file created above, explanation follows.
Line 1 :
// SPDX-License-Identifier: MITAn informative line to signify the license type of the entire code contained within the specific file.
Line 3 :
pragma solidity >=0.7.0 <0.9.0;Hey solidity, run this file using any of your versions ranging from 0.7.0 up till 0.9.0. Note that, unlike line 1, this line ends with a semicolon.
💡In Solidity, all lines that doesn't end with brackets, braces or parentheses must end with a semicolon.
Line 5-8 :
/**
* @title EscrowSol
* @dev Manages fund transfers between two parties
*/
Bunch of special type of comments called NatSpec (Natural Specifications). They are useful for automatically generating user documentation. How are NatSpecs different from ordinary multiline comments??? Jargons aside, its sufficient to know that generally comments can serve three purpose...
Comments can serve three purpose:- Communicate the code license (When present, its usually the first line?)
- Explain lines of codes within the program only to who has access to the souce code.
- Document sections of codes, these are multiline comments with some supported tags (such as
@title) calledNatSpecs. They can be automatically compiled to serve as documentation for the program.
Back to code explanation, here we declare the title with@titleand a one-line contract description with@dev
Line 9 :
contract EscrowSol { //} Closed on line 38We signify the beginning of our contract named
EscrowSoland everything within the parentheses on this line and its closing counterpart will be regarded by Solidity as part of this contract.... Why signify the beginning of a contract, after all solidity is for writing contracts? Well, more than one contract can be placed within a file, hence all elements that belongs to a contract, if not imported, must be encapsulated within the parentheses of the contract.Line 11:
  // Wallet address of the payer
  address public funder;
We need to know the funder and since we want anyone to access the funder's address, thus we added a
publicSolidity keyword to achieve that.💡Whenever a variable is assigned public, and automatic getter function is defined by Solidity which makes it possible for the world to see the current value of the variable. Thus, saving us some keystrokes of cooking up a getter function.
Line 13 :
  // Wallet address of the intended beneficiary
  address public beneficiary;
Same explanation as Line11 but now for beneficiary.
Line 15-17 :
  /// Lockup a certain crypto value.
  /// @param counterpart the address of the intended beneficiary
  /// @dev lockup crypto for the counterpart
NatSpecs for the fund function we are about to write. Note that the previous NatSpec was enclosed within "/"and "/" while this time around we used "///" on every line... Well, that’s a way of letting you know another way it can be achieved in Solidity.
Recall that we want the funder to specify the intended beneficiary at the time of funding, thus the only parameter we need to pass to this function. This is now explicitly stated in the NatSpec with the use of the@paramwhich is the only new tag here.Line 18 :
function fund(address counterpart) public payable { //Closed on line 21Generally in Solidity, a function is defined by using the
functionkeyword, give it a name, enclose arguments(if any) and their types in a bracket, followed by decorators/modifiers (if any), and lastly followed by a parentheses that encapsulate the codes to be executed when called.
💡 function name (varType1 varName1, ..., varTypeN varNameN) modifier1 ... modifierM returns(return_type) {
    line(s) of code
}
Therefore on line 18, we defined a function named
fundthat accepts the beneficiary address as an argument namedcounterpartdecorated withpublicSolidity keyword for it to be executable from anywhere and also decorated withpayablefor payment into the contract to be processed... What the heck ispayable??? Without going into much details, whenever cryptos are to be transferred, the address or function (as in this case) must be madepayableelse actual coin transfer will never take place.Line 19 :
beneficiary = counterpart;We set the beneficiary address to the counterpart address provided by the funder.
Line 20 :
      funder = msg.sender;
) // End of fund function
We set the address of the funder with
msg.senderHope you are not asking what ismsg?💡 When a contract is invoked, Solidity by default passes some global variables, including
msg, that posses properties which can be used to offer information about the blockchain.msggives information such as the public address that invoked the present operation (msg.address), the amount that is sent (msg.value) and the remaining cost of running the blockchain operation (msg.gas).Line 25 :
function release() public payable {We put in place a payable function named release.
Line 26-29 :
      if (msg.sender==funder){
          // Transfer all the funds to the beneficiary
         payable(beneficiary).transfer(address(this).balance);
      }
  } // End of release function
We ensure that the person calling this function is the funder after which we transfer all the funds locked-up in the smart contract to the beneficiary
Line 35-37 :
  function getBalance() public view returns (uint) {
      return address(this).balance;
  }
} // End of the contract
We now create a function named
getBalanceto enable us retrieve the value of funds in our contract . and in the process we introduced two new keywords(viewandthis).💡
viewkeyword is used to signify that a function shouldn't be allowed to make any change to the state of a contract on the blockchain though we still want to be able to read the state of the contract. If we don't also need to read any state properties, we could usepurekeyword instead.
Here, we accessed the balance of the contract through the this keyword.
💡
thiskeyword points to the currently running contract and stuffs that can be reached through it. In our case, we are simple concerned about its balance property.
Yey!!!! Its time to set our contract into action. Save it if you've not already.
Running our Escrow Contract
Remix is equipped with JavaScript VM that simulates blockchain which makes it easy to test smartcontracts on the go within a browser.
See the gif below, we first have to compile (this is most done automatically unless an error have been encountered) then deploy our smart contract.

Note that after deploying, we click on contract name below to reveal the eternally accessible variables and functions of the contract. Also notice that some buttons are coloured blue while some are coloured red.
💡 In Remix,
payablefunctions (functions that are capable of transfer a values between account) are coloured red.vieworpurefunctions (functions that does not cause any change in state of the contract, their job is just to return a value stored in the contract). are coloured blue.
By default, Remix JavaScript VM gives some addresses and fake ethers to run our contract, in this case we will assume: The second account to be the funder, while the third account to be the beneficiary. That said, let perform some operations after which you play around the contract as you deem fit. A gif illustration is displayed below followed by the list of the steps that was taken to run the contract.

- Click on the beneficiary, funder and getAmount buttons to verify that they are current empty
- Select the third account, which we intend to use as the beneficiary and copy the address.
- Select the second account, which we want to use as the funder.
- Input the amount to fund the contract in the value box. Let's assume we want to fund the contract with 1Ether.
- Go to the fund button, paste the beneficiary address copied in step2, and click fund. Notice that the value has been deducted for our ether balance.
- Click on the beneficiary, funder and getAmount buttons to verify that the values have been updated.
- Change to any of the remaining account (stranger) and try to release the fund by clicking on the release button. Check the balance again to see if it was successfully withdrawn. Notice that the amount still remain in the contract, this is as a result of line 26 of our code which ensures that only the funder has right to release.
- Now change the account back to the funders account.
- Click on release.
- Click on getBalance to verify that the fund has been moved out of the contract to the beneficiary. You can confirm that it went to the beneficiary address by checking the amount of ether on the third account.
Welldone!!!! you've developed the first version a blockchain smart contract in Solidity.
Areas for Further Improvement
Let's now take a look at some room for further development which we will explore in the next article of this series.
- Problem 1 : The funder is made to provide the beneficiary at the time of funding the contract, also note that the funder can always add more fund to the contract, well this is a good feature especially when the parties have some other agreements say the funder has to fund the escrow on milestone basis or the parties agreed to increase the amount in question...
The bad stuff with the current implementation is that, if the funder wants to be fraudulent, after the completion of the task he can call the fund function again and pass his fiancé's address as the beneficiary. This will ultimately release the fund to his fiancé 🥺.
Thus in the next post will still retain multiple funding but prevent updating the beneficiary account. - Problem 2: This current implementation involves no middleman, what if a dispute arise? Well, if we've fixed the security issue above, the funds will remain in the contract forever until released by the funder. Thus, We shall introduce a trusted party (such as is the case with peer to peer trading platforms) who runs the contract (instead of any of the parties) and will have the right, only incase of dispute, to release or refund funds.
These amongst other issues will be tackled in the next post of this series.
Let me go cook it up!!!

Comments
Join the discussionWaiting for the next
Thank you and I can't wait either.
Thanks for appreciating
Expecting the concluding part. Ewetoye, Ibrahim
Solidity in Easy Steps
In this series, we will walk through Solidity programming language in a practical stepwise manner. We will build a decentralized Escrow contact for individuals that doesn't trust each other 🤣.